
Start with a count, not a grid
Before you open any software or draw anything, count your dancers. Everything about formation design flows from that number.
For small groups (2–5), you have maximum flexibility — you can use almost any shape and still look clean, because the audience can track every dancer individually. Asymmetry reads as intentional rather than sloppy at this size.
For medium groups (6–12), visual hierarchy becomes the governing constraint. The audience stops tracking individuals and starts reading the overall shape, so you need to decide who is at the center, who is on the wings, and what the silhouette communicates. This is the size where formations most often fail — not because the shapes are bad, but because nothing in them tells the eye where to look.
For large groups (13+), geometry is your friend. Triangles, chevrons, wedges, and clean lines scale; organic clusters do not. With 20 dancers an "organic" arrangement reads to the audience as a crowd rather than a formation. Repeating geometric units — four rows of five, five columns of four — stay legible from the back of a house and are dramatically easier to teach and to fix in rehearsal.
Map the stage, not the floor
Always design formations from the audience's perspective, not from above. What looks symmetrical on paper can look off-center on stage depending on where the audience is seated.
Use a landscape rectangle as your canvas if your audience faces the front. Use a portrait rectangle if your stage thrusts forward or the audience wraps around. This matters more than it sounds: a formation designed on a square canvas and performed on a wide stage puts every dancer too close to center, because you unconsciously spaced them relative to the canvas edges rather than the real ones.
Two related mistakes are worth naming. Designing for a studio and performing on a stage — studio mirrors give you a squarish room with clear side walls, and dancers space themselves off those walls. On a stage there are no side walls, and the same choreography drifts inward. Forgetting sightlines — a dancer at dead center rear is invisible behind a dancer at dead center front for most of the house. Offset back rows by half a position so every dancer has a lane to the audience.
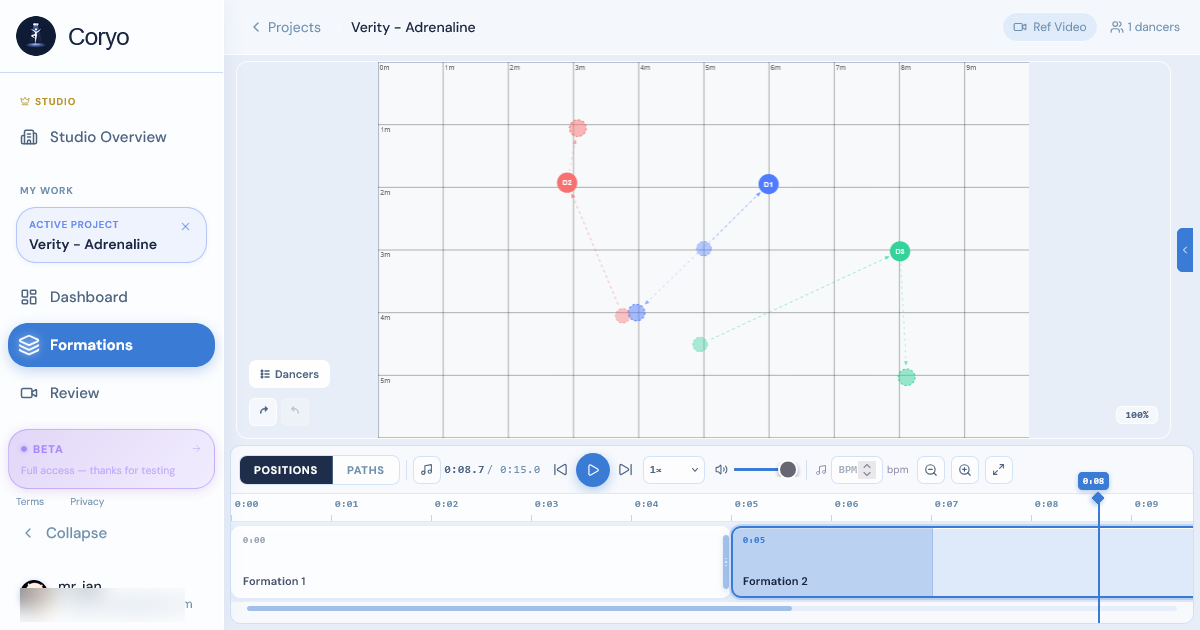
In Coryo's formation editor you set the stage orientation before placing any dancers, so the canvas stays proportionally accurate from the first drag.
To try this quickly, open the free formation maker, enter your stage's real width and depth, and the chart is drawn to scale in 1-metre squares.
Identify your key moments first
Listen to the song and mark 3–5 moments where a formation change would have visual impact: the first chorus, a key breakdown, a bridge, the final chorus. These are your formation anchors.
Don't try to plan every beat — plan those anchors first, then fill in transitions. This gives you a skeleton that's musically grounded, and it prevents the most common over-correction: more formation changes than the team can memorise.
The rule worth internalising is that audiences register change, not count. A piece with five well-placed formation changes that land on musical events reads as more dynamic than one with twelve that land arbitrarily. If a formation change doesn't coincide with something the audience can hear, they experience it as motion noise rather than as structure.
A practical test: play the track and clap at every moment you'd want the picture to change. If you clap more than seven or eight times in three minutes, you're planning movement, not formations.
Space dancers evenly — and then break it intentionally
Even spacing is the default. Arm's length plus a buffer (roughly 1.5–2 meters between each dancer) gives everyone room to move without collisions, and it is what the eye expects.
But intentional uneven spacing creates visual interest. Two dancers close together with a gap before the next group creates a cluster effect that can emphasise a lyric or a musical moment. Negative space is a design element in its own right: an empty downstage-right quadrant with everyone packed stage-left is a strong picture, and it costs nothing to execute.
The distinction that matters is whether the audience can tell it was a choice. Uneven spacing that's consistent across a formation — a deliberate 2-3-2 grouping, say — reads as design. Uneven spacing that varies by a few inches per dancer reads as a team that hasn't cleaned its spacing. This is why "just eyeball it" fails at scale: the errors are individually invisible and collectively obvious.
If you're working on a canvas, this is where a grid and snapping earn their keep — they make deliberate asymmetry easy to place precisely and easy to reproduce in the next formation.
Plan transitions as paths, not teleports
Each dancer needs a path from their current position to their next formation position. The most common mistake in formation design is planning beautiful start and end pictures without ever checking whether the routes between them collide.
Map each dancer's route. If two paths cross, you have three tools: stagger the timing so one dancer clears the intersection before the other arrives; reroute one dancer along a curve rather than a straight line; or reassign positions so the two dancers who were going to swap sides simply don't. The third option is the one people forget, and it's usually the cheapest — if position 4 and position 7 are trading places across the whole stage, ask whether the formation actually requires those two specific dancers in those two specific spots.
Transitions also have a duration, and it has to be physically possible. A dancer crossing the full width of a stage needs roughly two counts of 8 at a walk and one at a run — and a run mid-piece is a choice the audience will notice. If your transition asks a dancer to cover twelve feet in four counts while executing choreography, it will look rushed no matter how clean the end formation is.
In Coryo, the timeline shows each dancer's movement and lets you preview the full transition animated before you bring it to rehearsal. Catching one collision on a laptop saves twenty minutes of studio time and a room full of confused dancers.
Planning formations online: what the workflow looks like
Before digital tools, formation planning meant printed grids, index cards, or whiteboard diagrams — visual, but not shareable, easy to sketch and hard to update. Online tools invert that trade: slower to sketch the very first idea, far faster for everything after it.
The process is broadly the same regardless of which tool you pick:
1. Set your stage dimensions (landscape for a front-facing audience, portrait for a thrust) 2. Add your dancers — a name and a colour for each 3. Place them in a starting formation on the canvas 4. Build additional formations for each section of the piece 5. Preview the transitions between them 6. Share with the team
The tool determines how fast and how well each step goes. Four things separate a formation editor you keep using from one you abandon after a week:
Stage-accurate proportions. Your digital canvas should match your real stage orientation, for the reasons above.
Per-dancer identifiers. Each dancer needs a persistent label and colour that follows them across every formation. Without this you're counting heads to work out who is who, and any formation past the third becomes unreadable.
Animated transition preview. Seeing dancers move between formations along real paths is the single highest-value feature in formation software, because it catches the class of error that is most expensive to find in rehearsal.
Multi-formation sequencing. You need to build a full piece, not a single layout — arranging formations in order, assigning timing, and previewing the sequence against the track.
Building a formation plan in Coryo, step by step
Step 1 — Set up the project. Create a project, add your dancers (name, colour), and set the stage dimensions to match where you'll actually perform.
Step 2 — Build your opening formation. Drag dancers into their starting positions on the canvas.
Step 3 — Add a formation per anchor. For each key section you identified in the song — chorus, bridge, finale — add a new formation and place dancers in their new positions.
Step 4 — Preview the transitions. Coryo animates the movement between formations, drawing each dancer's path. This is where you catch collisions and crossings. Adjust paths, timing, or position assignments until every route is clean.
Step 5 — Sync to the music. Assign a duration to each formation so the sequence lines up with your track, then play the whole piece back against the audio to check that changes land on the musical events you marked.
Step 6 — Share. Team members open the project directly and see the same canvas, sequence, and timing. No exports, no stale PNGs in a group chat.
The free plan covers this workflow for one project with up to 7 members and 3 formations per project. Learn more about Coryo's formation editor →
Common mistakes when planning formations
Building formations without checking transitions. Worth repeating, because it is by far the most frequent and most expensive error. Always preview the animated path before rehearsal.
**Using a canvas that doesn't match your stage.** If your stage is 20 feet wide and your canvas is square, your spacing will be wrong in a way that only becomes obvious in the venue.
Planning without assigning dancers. Abstract positions ("position 2") are fine while you're designing, but before the first rehearsal every position needs a name attached. "Formation 3, position 2 = Mia" should be readable from the plan, not negotiated on the floor.
Not updating the plan after rehearsal changes. A formation plan is a living document. If you move someone in the studio and don't update the file, the plan becomes actively misleading — dancers stop trusting it, and then it's just a diagram nobody reads.
Designing every formation from scratch. Most pieces reuse structural ideas — a wedge, a staggered line, two columns. Establishing two or three base shapes and varying them is faster to plan, much faster to teach, and usually reads as more coherent than seven unrelated pictures.
Getting your team to actually use the plan
The best formation plan in the world doesn't help if nobody looks at it before rehearsal. Three things move the needle:
Share it early, and say out loud that it exists. Send the plan a day before rehearsal and mention it at the end of the previous session: "Formation 3 is posted — review it before Saturday." A link nobody was told about is a link nobody opens.
Assign positions before the first rehearsal. Nothing makes a plan relevant to a dancer faster than seeing their own name on it. Assigned positions create personal stakes; abstract dots create none.
Review one formation together at the start of each session. Pull the plan up on a screen, show the formation you're working on, show each dancer their spot, then run it. A visual reference transfers faster than verbal description, and it costs ninety seconds.
The underlying point is that formation planning isn't really a design problem — it's a communication problem with a design step in the middle. The plan's job is to get a picture out of your head and into eleven other heads accurately. Judge your tools and your process on that, not on how good the diagram looks. See what's included in each plan →